Post by Parazombie on Jul 30, 2014 16:07:29 GMT -7
During my past few contests that involved posting pictures, I received a few messages from people telling me Photobucket was giving them a headache. It gave me one too! After I became a moderator though, I decided to figure it out once and for all!
And I did!
So here is a step-by-step tutorial for posting pictures using Photobucket!
*Note: This is just a very basic guide on the actual image posting on the site. If you need help editing one of your photos with the "Media options", let me know and I might do a tutorial for that as well.
This is my first tutorial EVER with images, so if something isn't clear enough, let me know and I'll change it.
Step 1: Go to www.photobucket.com and either sign in if you have an account, or register for one if you don't.
Step 2: Once you have the account set up, you'll get a screen that looks something like this:
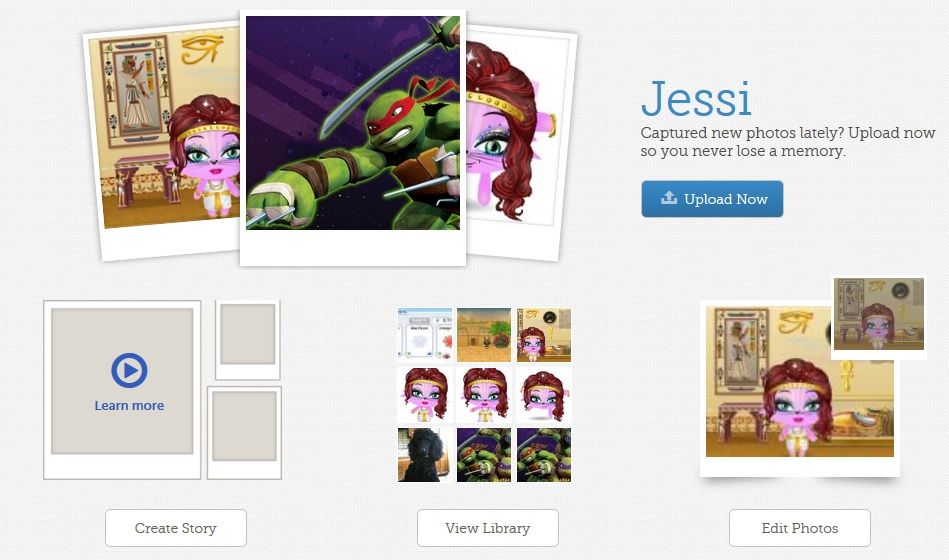
Step 3: Click "Upload Now"
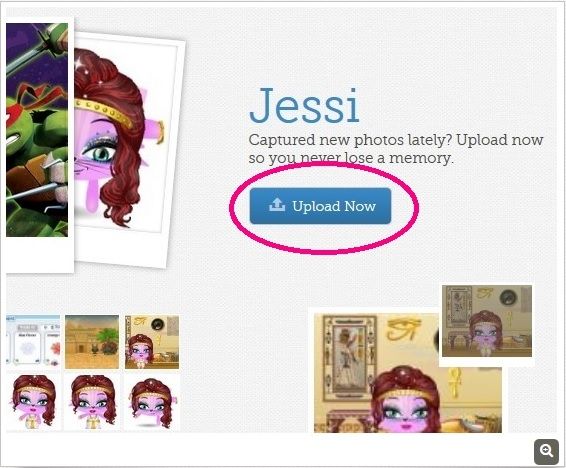
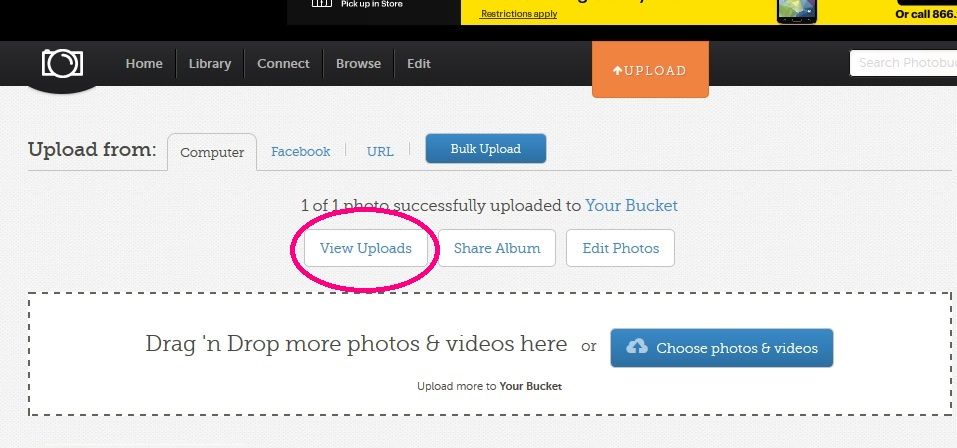
Step 4: Once your image has finished uploading, click "View Uploads"
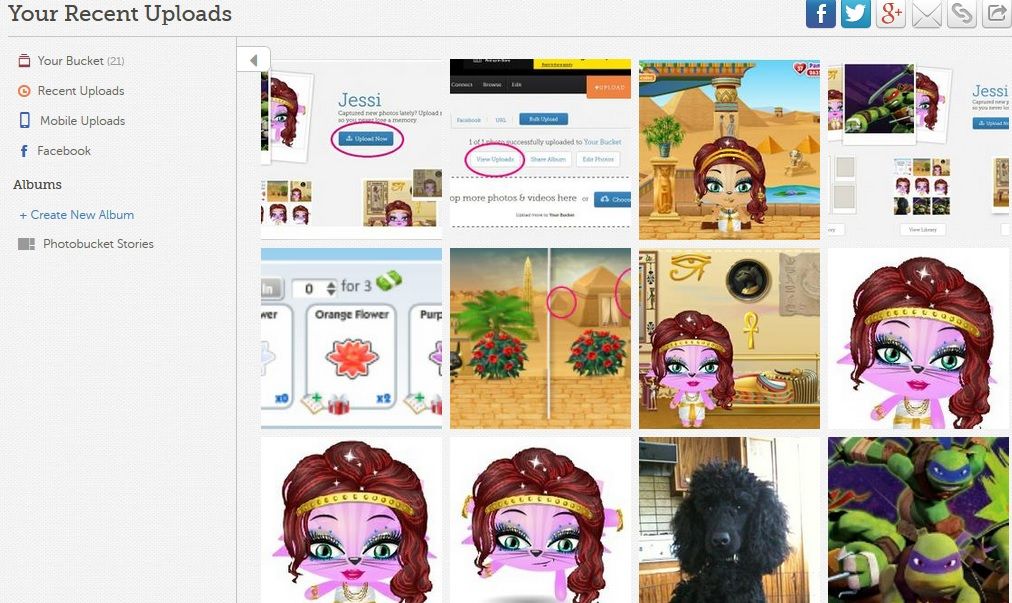
Step 5: Your screen should look like this. Click on whichever image you would like to upload to the site
Step 6: Click on "Click to add description". It will be directly below your image. As you can see, I already added mine.
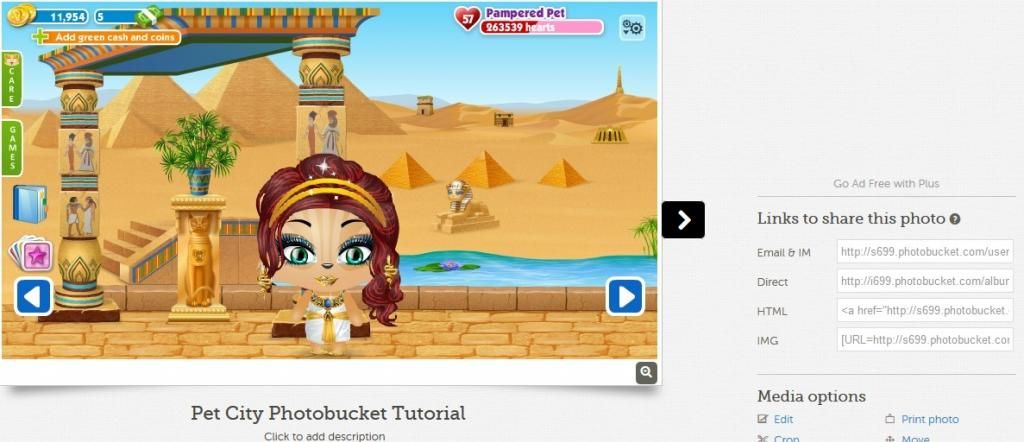
Step 7: Pay VERY close attention to this one! To the right of the image, you will see a list of four options under "Links to share this photo". USE "DIRECT"! It won't work for any of the other options for me, so ALWAYS use the "Direct" option. This is so you can copy the image location. All you have to do is click on the long address once, and it will automatically copy it for you. Make sure you click on the one associated with "Direct"

Step 8: Also VERY important! After clicking on "Reply" (NOT Quick Reply, that won't let you upload images) you will see a few options to the top right for adding images. Click on the one that has a picture on it called "Insert Image". I have it circled below.

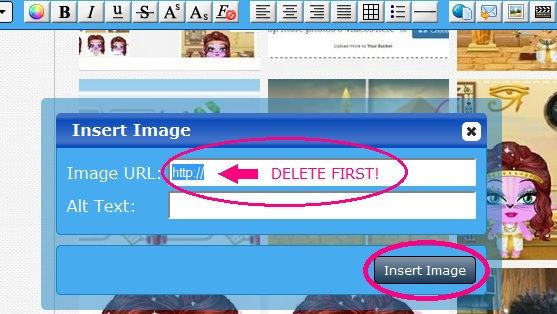
Step 9: When you click on "Insert Image" you will get a pop up that looks like the image below. Before pasting the long address you copied (easiest way to paste it in that little box is to hold down ctrl and the letter v at the same time) you MUST delete the "http://" that will already be in the box. I have it circled below. After doing that, click "Insert Image"
And, you're DONE! You should see your image in the reply box. If you don't, go back through the process carefully, and make sure you do each of the 9 steps correctly.
If this is confusing to you, please PM me and let me know. It takes a while to get the hang of it for some, and I certainly don't mind explaining it to anyone until they become an expert.
And I did!
So here is a step-by-step tutorial for posting pictures using Photobucket!
*Note: This is just a very basic guide on the actual image posting on the site. If you need help editing one of your photos with the "Media options", let me know and I might do a tutorial for that as well.
This is my first tutorial EVER with images, so if something isn't clear enough, let me know and I'll change it.
Step 1: Go to www.photobucket.com and either sign in if you have an account, or register for one if you don't.
Step 2: Once you have the account set up, you'll get a screen that looks something like this:

Step 3: Click "Upload Now"

Step 4: Once your image has finished uploading, click "View Uploads"

Step 5: Your screen should look like this. Click on whichever image you would like to upload to the site

Step 6: Click on "Click to add description". It will be directly below your image. As you can see, I already added mine.

Step 7: Pay VERY close attention to this one! To the right of the image, you will see a list of four options under "Links to share this photo". USE "DIRECT"! It won't work for any of the other options for me, so ALWAYS use the "Direct" option. This is so you can copy the image location. All you have to do is click on the long address once, and it will automatically copy it for you. Make sure you click on the one associated with "Direct"

Step 8: Also VERY important! After clicking on "Reply" (NOT Quick Reply, that won't let you upload images) you will see a few options to the top right for adding images. Click on the one that has a picture on it called "Insert Image". I have it circled below.

Step 9: When you click on "Insert Image" you will get a pop up that looks like the image below. Before pasting the long address you copied (easiest way to paste it in that little box is to hold down ctrl and the letter v at the same time) you MUST delete the "http://" that will already be in the box. I have it circled below. After doing that, click "Insert Image"

And, you're DONE! You should see your image in the reply box. If you don't, go back through the process carefully, and make sure you do each of the 9 steps correctly.
If this is confusing to you, please PM me and let me know. It takes a while to get the hang of it for some, and I certainly don't mind explaining it to anyone until they become an expert.


